

Quick take: This flowchart helps you decide the best care quickly when symptoms hit hard.
If you have any of these emergency signs, chest pain, trouble breathing, call emergency services immediately.
When many symptoms come at once, it can feel overwhelming. Our step-by-step guide is like a clear map that leads you to the right care. It uses trusted advice to ensure that serious signs don’t get missed.
Every step is designed to save precious seconds because each moment counts for your health. Use this simple plan to check your symptoms and know when to act or monitor.
Implementing a Comprehensive Triage Flowchart for Symptom Evaluation
Quick take: This flowchart helps you decide fast on the right care pathway.
Triage Box:
• Call emergency services now if you see severe breathing trouble, chest pain, or loss of consciousness.
• If you spot signs of critical illness like sepsis (a severe body infection), get same-day urgent care.
• For milder symptoms, follow routine steps and keep a close watch on changes.
A comprehensive triage flowchart is like a clear map for checking and managing symptoms step by step. It is built on trusted emergency nursing standards, so every step comes from proven practices. This clear guide means nurses know exactly what to do when a patient shows worrying signs, vital when every second counts.
The flowchart starts by gathering basic patient information. Then it moves quickly to check for life-threatening signs. Finally, it guides you to a clear decision on the best level of care. This setup cuts out confusion by showing whether the patient needs an emergency referral or can safely wait for routine follow-up. For example, if a patient has signs of sepsis, the nurse can use the chart to decide the next step in a rush.
Using this clear blueprint helps hospitals handle busy times. Data shows that emergency visits increased by 32% between 1996 and 2006, with 20% of U.S. people visiting an ED in 2005. This flowchart not only creates a standard way to check each patient encounter but also speeds up decisions in hectic settings, ensuring patients get the proper care right when they need it.
Core Components in a Symptom Evaluation Triage Flowchart
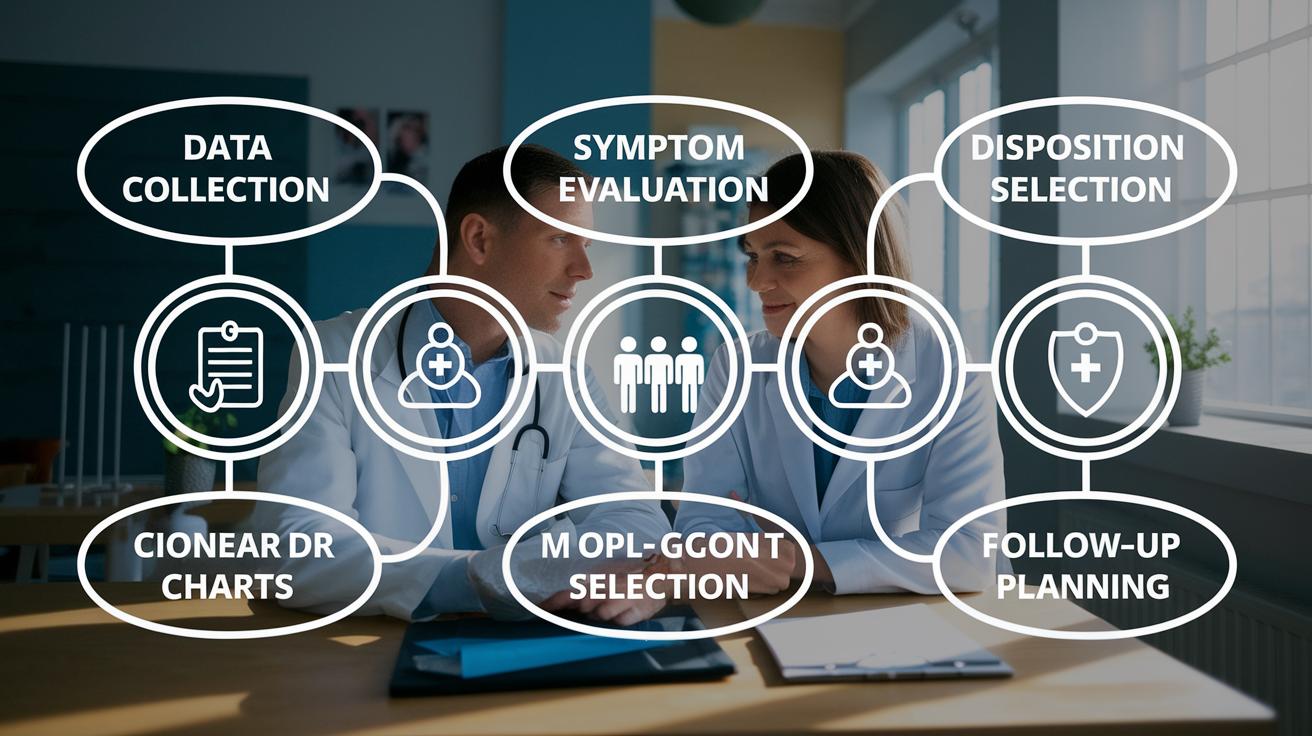
This screening model has five main parts that work together to help guide patient care safely. The five parts are Data Collection, Symptom Evaluation, Disposition Selection, Advice-Giving, and Follow-Up Planning. Two experienced doctors, with over 30 years of combined practice, helped design this flowchart. The model is updated often to follow current clinical rules. It is used in nurse triage software and telehealth systems so that patient details and symptoms are recorded correctly following proven methods.
Using these five parts makes care both safe and consistent. When every team follows the same steps, they lower mistakes and keep care predictable. A steady flowchart with clear instructions helps healthcare workers manage each stage. This careful approach is important in both emergencies and everyday care. It lets clinicians confidently deliver timely and proper care.
| Module | Purpose | Key Actions | Clinical Example |
|---|---|---|---|
| Data Collection | Gather patient history and vital details | Record symptoms, measure vital signs, note the timeline | Initial patient intake form |
| Symptom Evaluation | Check symptom severity and pattern | Match with protocols, assess risk level | Reviewing fever and breathing concerns |
| Disposition Selection | Decide the level of care needed | Determine urgency, choose the right care path | Referring high-risk cases to the ED |
| Advice-Giving | Offer guidance on self-care or urgent steps | Share treatment guidelines and safety steps | Suggesting home care for minor symptoms |
| Follow-Up Planning | Set up monitoring or appointments | Arrange check-ups, advise on warning signs | Scheduling a visit after initial assessment |
Differential Symptom Classification within the Triage Flowchart
Quick take: The flowchart sorts your symptoms by how urgent they are, helping you see fast which ones need emergency care and which can wait.
This tool uses a simple chart to put symptoms into different levels. It lets you quickly tell the difference between issues that might be life-threatening and those that do not need immediate care. The design sorts complaints from high risk to minor concerns so clinicians can act fast.
Global triage scales back up this system. Scales like the Australasian Triage Scale, the Canadian Triage and Acuity Scale, and the Manchester Triage Scale each have special rules and time goals for checking patients. The Australasian and Canadian systems focus on many patient details to spot severe issues. In contrast, the Manchester system uses flowcharts with colors to signal urgency. These methods work together as a clear guide for matching symptom seriousness with the right care.
Adding the Emergency Severity Index or ESI to the flowchart boosts its ability to predict how much care you may need. The ESI looks at what resources each person might use alongside the other scales. This mix of resource needs and clinical signs helps ensure a quick check and provides the proper level of medical attention for your symptoms.
Identifying Red Flags in a Quick Complaint Sorting Guide

Quick take: Some symptoms are warning signs that need immediate attention.
If you see any of these emergency signs, call emergency services right away:
- Airway problems (trouble breathing or choking)
- Chest pain with heavy sweating (severe pain with lots of sweat)
- Confusion (altered mental state, such as being drowsy or disoriented)
- Signs of a serious infection (sepsis: high fever with a fast heart rate or low blood pressure)
- Sudden, severe abdominal pain (intense stomach pain that comes on quickly)
- Uncontrolled bleeding (large blood loss from an injury)
- Sudden weakness or numbness (which could warn of a stroke)
- Trouble speaking (slurred speech or difficulty forming words)
When you spot any of these red flags, act fast. Follow your urgent assessment steps to start proper care or transfer the patient immediately to an emergency service.
Escalation Protocols and Urgent Care Decision Tree Integration
Quick take: Fast checks by trained nurses spot dangerous signs, guiding you to the right level of care.
If you have any of these emergency signs, call emergency services now:
- Severe chest pain
- Trouble breathing
- Signs of sepsis (high fever, rapid heart rate, confusion)
When you arrive with concerning symptoms, an experienced nurse immediately looks for red flags. They check for severe chest pain, breathing troubles, or sepsis signs. This fast review uses a clear checklist to decide if you need emergency care without delay.
Once urgent risks are ruled out, a full evaluation starts. Nurses take your history and review all your symptoms using a step-by-step decision tree. They measure your vital signs, note how long you have been ill, and compare your symptoms with clinical guidelines. This careful process helps decide if you need more tests or if routine care will do.
New methods, like triage bypass and team triage, help speed up treatment. With triage bypass, you might skip long initial checks if your condition is stable. Team triage means nurses and doctors assess you at the same time. These approaches cut wait times and make sure you get prompt care based on your needs.
As new data comes in, clinicians update your care plan immediately. This real-time approach, coupled with ongoing monitoring and feedback, steers you quickly to the right care. Every decision is made with safety and speedy treatment in mind.
Sample Clinical Scenarios Applying the Triage Flowchart

Imagine you have a sharp earache. A 45-year-old patient calls with pain that began a few hours ago. The nurse first asks about the pain level, any drainage from the ear, and if there is a fever. Then, the nurse looks for warning signs such as sudden hearing loss or infection. If no dangerous signs are found, the nurse recommends simple home care. This includes resting, using a warm compress, and following up if the pain gets worse after 24 hours.
Now, think of a worried parent calling about a child’s cough. The nurse asks for key details like the child’s age, how long the cough has lasted, whether there is a fever, and if breathing is difficult. If the child seems well and the cough is mild, the nurse advises keeping the child comfortable at home. This means plenty of fluids and rest. The nurse also explains which signs, like a high fever or increased trouble breathing, should prompt another call.
In another example, an adult calls about an ankle and foot injury. The nurse asks about the severity of the pain and checks for red flags such as swelling, a deformed ankle, or not being able to walk. If nothing dangerous is found, the nurse digs deeper into the injury details. Depending on the answers, care may include rest, ice, compression, and elevation. If the injury seems more serious, the nurse may suggest an imaging study or a quick referral. This step-by-step method helps decide whether a patient needs a follow-up visit or immediate action.
Integrating a Comprehensive Triage Flowchart into Clinical Practice
Quick take: A strong training program and clear, step-by-step planning help you use a triage flowchart to boost patient safety and smooth workflow.
If you see issues with patient safety or workflow delays, act now by checking your tools and training. Make sure your team can use nurse triage software well, even when handling telehealth and remote monitoring. Use outsourced support if needed.
Common causes for delays in care include unfamiliarity with the software and lack of clear guidelines. Here's how to set up your flowchart safely:
- Choose the right software.
- Tailor the flowchart to your needs.
- Train all staff thoroughly.
- Run a pilot test.
- Review and update continually.
Keep your system strong with regular quality checks. Get feedback from the frontline and track key markers to make sure your flowchart stays aligned with best practices. Regular review sessions and occasional retraining help the team stick to the plan. This practical, step-by-step process builds a reliable system that supports quick, safe patient care every time.
Best Practices for Maintaining and Updating the Triage Flowchart

Keeping your triage flowchart accurate is an ongoing task. You need to review it often using clear, step-by-step checks based on the latest evidence. Regular updates help ensure that your tool stays reliable and ready for rapid decision-making.
Every year, compare your flowchart against new clinical updates, like those from the 2022 nurse self-study guide. Watch key emergency department numbers and listen to staff feedback. This way, you can spot areas that need improvement as healthcare changes.
A steady review routine not only protects patient safety but also shows that each update is backed by real-world data and current guidelines. By staying current, you build a strong, responsive tool for quick symptom assessment and safe care.
- Audit outcome data
- Update protocols
- Retrain staff
- Monitor key indicators
- Incorporate new triage scales
- Collect frontline feedback
- Revise and republish the flowchart
Final Words
In the action, we outlined a step-by-step guide that shows how a comprehensive triage flowchart for symptom evaluation works. We covered key decision points, red flags, and real-life scenarios that help narrow down potential causes. The guide also detailed best practices for integrating the flowchart into everyday clinical practice. Each section aims to empower quick, safe decisions while providing clear next steps. Stay proactive and use this roadmap to enhance your care approach, ensuring faster and more accurate evaluations.
FAQ
How to do triage assessment?
The triage assessment involves evaluating symptom severity, gathering patient history, and applying structured protocols to quickly identify urgent cases and prioritize care effectively.
What is a triage checklist?
A triage checklist is a list of essential steps and signs used to swiftly assess symptoms and ensure that no critical detail is missed during the patient examination.
What does a triage chart show?
A triage chart displays symptom severity levels and decision pathways using visual aids like color codes to help guide quick and accurate patient assessments.
What are triage protocols?
Triage protocols provide step-by-step guidelines for systematically assessing symptoms, ensuring that each patient receives timely and appropriate care based on their urgency.
What is triage priority?
Triage priority classifies patients by urgency, assigning levels that determine which cases need immediate intervention and which can wait, streamlining care delivery.
What are key triage symptoms?
Key triage symptoms include signs like chest pain, difficulty breathing, severe bleeding, and altered mental status, all of which require prompt and careful evaluation.
What are examples of triage notes?
Triage notes typically document patient history, vital signs, observed symptoms, and the immediate actions taken, serving as a clear record for subsequent care decisions.
What are triage examples in nursing?
In nursing, triage examples include assessments like evaluating chest pain or shortness of breath, using protocols and clear documentation to ensure high-risk patients receive priority care.
What are the 5 levels of triage?
The five levels of triage range from immediate life threats (level 1) to non-urgent cases (level 5), providing a framework to guide urgency and resource allocation.
What are the steps of the triage process?
The triage process involves rapid assessment, symptom evaluation, urgency classification, clear documentation, and immediate intervention or referral based on clinical guidelines.
What is comprehensive triage?
Comprehensive triage uses a detailed flowchart that combines patient assessment, symptom evaluation, and decision protocols to deliver consistent, safe care under varying patient loads.
How do you do a triage assessment?
You do a triage assessment by collecting patient history, measuring vital signs, evaluating symptom severity, and using structured flowcharts to guide timely and effective care decisions.