
Quick take: A clear, steady picture of your rash helps you and your doctor track any changes.
If you notice the rash getting worse or new symptoms starting, seek urgent care.
Here’s how to create a helpful photo record:
• Use a plain, well-lit background.
• Take a steady picture so details aren’t blurry.
• Include a size reference like a coin or your finger to show scale.
These steps make it easier for you to monitor changes and share key details with your clinician. Tracking your rash with clear photos gives you more control over your care.
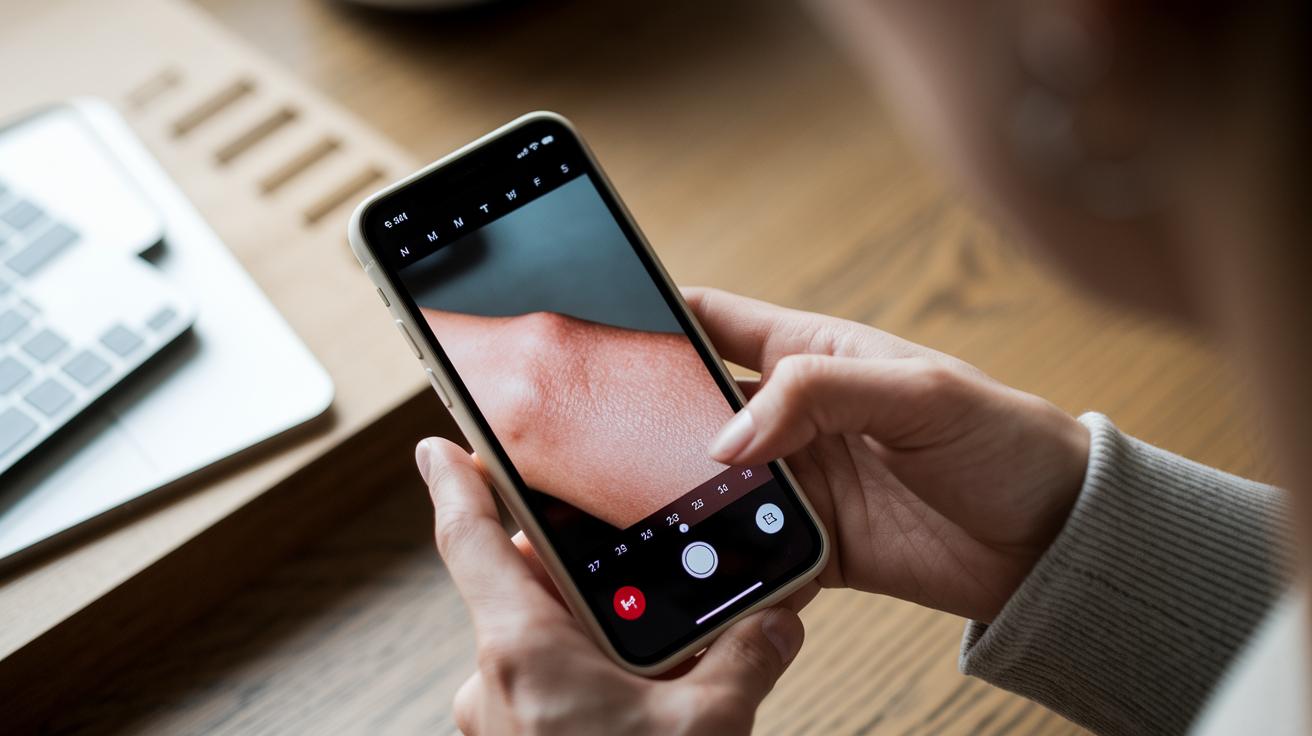
Achieving Consistent Rash Photos
Clear photos can help you track your rash over time. If your rash is causing you worry or gets worse, call your doctor right away.
Pick a plain background like a white sheet or light-grey wall. This keeps the focus on your rash. Make sure the rash stays centered in your shot and keep your camera parallel to your skin so every photo looks the same.
Before you take any pictures, gently wipe your lens with a microfiber cloth. This small step stops smudges from blurring the details. Also, turn off your camera’s flash (set it to OFF) to avoid glare and bright spots that hide key details.
For close-up photos that show fine details, hold your smartphone about 6 to 8 inches from your skin. For a wider view that includes the area around the rash, step back to about 12 to 18 inches. Use a tripod or rest your elbows on a stable surface to keep your images steady and clear.
Don’t forget to add a size reference in one of your photos. Place a coin, ruler, or even your index finger next to the rash. This helps you and your doctor see how big the rash is.
Follow these best practices:
- Use a plain background.
- Keep the camera at a consistent angle.
- Take both close-up and wider shots.
- Steady your device to avoid blurriness.
- Include an object for size comparison.
For example, a clear, steady photo taken with good light and a plain background can boost diagnostic accuracy significantly compared to a poorly lit image.
Rash photo tracking tips Shine With Confidence
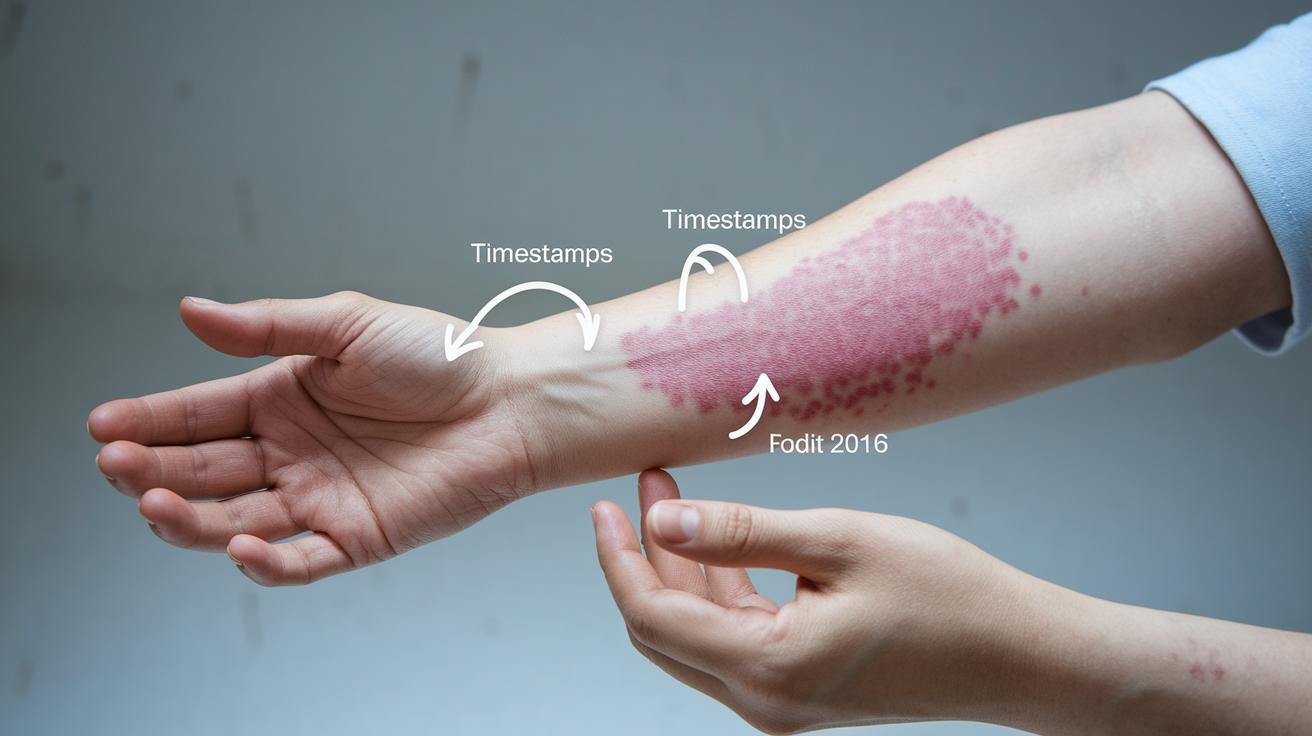
Keep a clear visual record of your rash using your phone. Snap a photo each day or whenever you notice a change. If your rash is fast-changing, like hives, take pictures every hour. Use an app that saves clear JPEG or PNG files. Write down the date, time, and a note about any changes you see. This simple habit helps you and your doctor see how your rash evolves over time.
Short videos can also show how your rash spreads and changes texture. Videos give details that still images might miss. Make sure the photos and videos keep their date and time stamps. This helps you compare them later and notice small differences in color, size, and texture.
Try these steps:
- Take photos regularly, even hourly if your rash changes fast.
- Use an app to add the date, time, and a short note to each image.
- Record brief videos to capture moving details.
- Check that each file keeps its timestamp metadata.
For more tips, consider a symptom tracker app or read a step-by-step guide to keeping a symptom diary to help boost your tracking skills.
Optimizing Lighting and Color Fidelity for Rash Photography
Good lighting is key to showing the true color and details of your rash. Use soft, indirect daylight from a north-facing window or a lamp with a diffuser to light your skin evenly. Avoid direct sun or harsh overhead lights that cast strong shadows and change how colors look. Also, turn off your camera flash so you capture the real texture and hues.
For conditions like eczema, using side light can help you see subtle textures, such as thickened skin (lichenification) or small cracks. If your camera lets you, adjust the exposure manually to ensure your image is not too bright or too dark. Using the same lighting each time helps you build a clear timeline of how your rash changes.
Steady, natural light brings out your skin's true tone and texture. This makes it easier for you and your doctor to notice small changes over time. Stick with one lighting set-up and avoid mixing different light sources, which can confuse color balance and blur important details.
Advanced Comparison Techniques for Rash Photo Tracking
Quick take: Use clear photos to track your rash and spot changes over time.
Triage:
- If your rash spreads quickly, causes severe pain, or you have trouble breathing, call emergency services immediately.
- If the rash gets worse or you notice new symptoms, seek same-day medical care.
- For small changes, monitor and note the details.
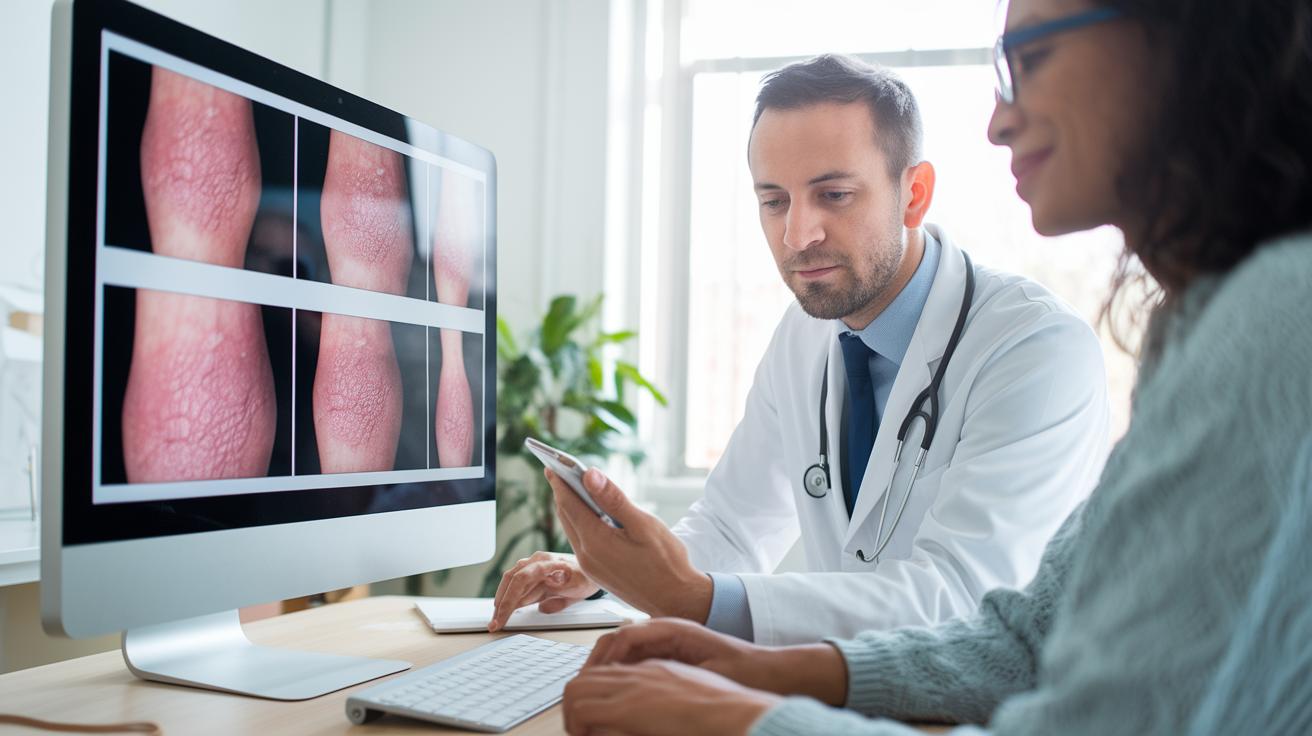
You can track your rash by using simple photo-editing software. Overlay a photo taken today with one from a few days ago to see small changes in color, shape, or size.
Add arrows or labels to your photos. For example, you might note "edge darker today" next to an arrow that points to a change. This helps you notice if the rash is growing or getting better.
Include a measuring tool like a ruler or grid in one photo. Make sure you place it in the same spot each time so you can compare size accurately.
Take photos from different angles. A front view and a side view can show changes in bumps or raised areas that might be missed in just one shot.
Make mild edits to boost clarity. Crop your image instead of using digital zoom to keep the resolution sharp while highlighting fine details.
Follow these steps:
- Overlay photos from different dates.
- Mark changes with arrows or labels.
- Include a ruler or grid for size comparison.
- Capture images from multiple angles.
- Enhance clarity with subtle edits.
Using these techniques gives you a clear record of your rash for you and your doctor.
Securing and Organizing Rash Photo Records
Keep your rash photos safe and ready to share with your doctor. Save them as high-quality JPEG or PNG files so you capture all the details for accurate future checks.
Store your images in secure cloud services or in folders protected by a password. This step keeps your private photos safe from unwanted access. Set up automatic syncing on your mobile device to ensure you never lose these important records if your phone is lost or broken.
Before you share any images, make sure you have permission if the photos include other people. Protecting personal details is key. Organize your records by date and by where on your body the rash appears. For example, you can create folders labeled "Arms" and "Legs" or tag each photo with the date it was taken.
Follow these steps:
- Save photos in high-quality JPEG or PNG format.
- Use encrypted cloud storage or password-protected folders.
- Enable automatic syncing on your phone.
- Organize images by date and by body location for easy review later.
Knowing When to Consult a Professional with Rash Photos
Quick take: Take clear photos of your rash and act quickly if it shows warning signs.
If you notice any of these red signs, call emergency services or seek care immediately:
- Rash spreading fast
- Very painful or burning skin
- Oozing or signs of infection
- Accompanying fever (102 F or higher)
Your doctor can often review clear pictures if you cannot visit in person. Use both close-ups and wider shots so your clinician sees the full rash and its surroundings. Keeping a photo timeline helps show how your rash changes over time.
For the best results, take pictures using the same angle and good lighting every time. Write down the date, a short note about your symptoms, and any changes you see. This step-by-step record lets your doctor track treatment progress more easily.
When you have a telehealth visit, share your photo log and notes. Doing this helps your doctor decide the best care for you.
Final Words
In the action, you now have a clear plan to capture consistent, clear rash photos using a neutral backdrop, proper angles, and precise lighting. You learned how to use digital tools for tracking changes, employ comparison techniques, and securely organize your records. Remember, these rash photo tracking tips can help guide discussions with your clinician when needed. Each step builds a smart way to monitor your skin safely. Stay proactive and confident, you’re well-prepared to manage your health with care.
FAQ
What is dermoscopy photography?
Dermoscopy photography is capturing close-up images of skin using a special tool called a dermatoscope. It helps document skin patterns, including the frogspawn pattern seen in some lesions.
What are some common names for skin infections?
Skin infection names include conditions like impetigo, cellulitis, and folliculitis. These terms describe various infections that may require different treatments.
How does frogspawn pattern dermoscopy work?
Frogspawn pattern dermoscopy highlights a skin pattern resembling frog eggs. This observation helps clinicians determine if a lesion is benign or needs further review.
Can I take a picture of a rash to determine what it is and then google the image?
Taking a picture of a rash can be useful for tracking changes, but using online searches or images for diagnosis is unreliable. You should always consult a healthcare professional for an accurate evaluation.
How can I follow up on a rash effectively?
To follow up on a rash, take consistent, clear photos with notes on changes and timing. This documentation supports your clinician in assessing the condition accurately over time.
Is there an app to help identify or track rashes?
Some apps allow you to log and track rash images with dates and notes. Although these tools help monitor changes, a clinician should review the images to confirm a diagnosis.
sildenafil dogs dosage
sildenafil dogs dosage
levitra viagra tablet
levitra viagra tablet
semaglutide ozempic wegovy dosage
semaglutide ozempic wegovy dosage
ozempic teeth celebrity
ozempic teeth celebrity
tadalafil standard doses
tadalafil standard doses
minoxidil 5mg capsulas
minoxidil 5mg capsulas
acyclovir tablets 400mg
acyclovir tablets 400mg
terbinafine dosage for athlete’s foot
terbinafine dosage for athlete’s foot
ketoconazole scientific overview
ketoconazole scientific overview
ketoconazole indication expert guide
ketoconazole indication expert guide
ivermectin pharmacology summary
ivermectin pharmacology summary
ivermectin demodex treatment overview
ivermectin demodex treatment overview
ivermectin rosacea results
ivermectin rosacea results
minoxidil general questions
minoxidil general questions
sildenafil reduced absorption
sildenafil reduced absorption
vardenafil vs sildenafil comparison analysis
vardenafil vs sildenafil comparison analysis